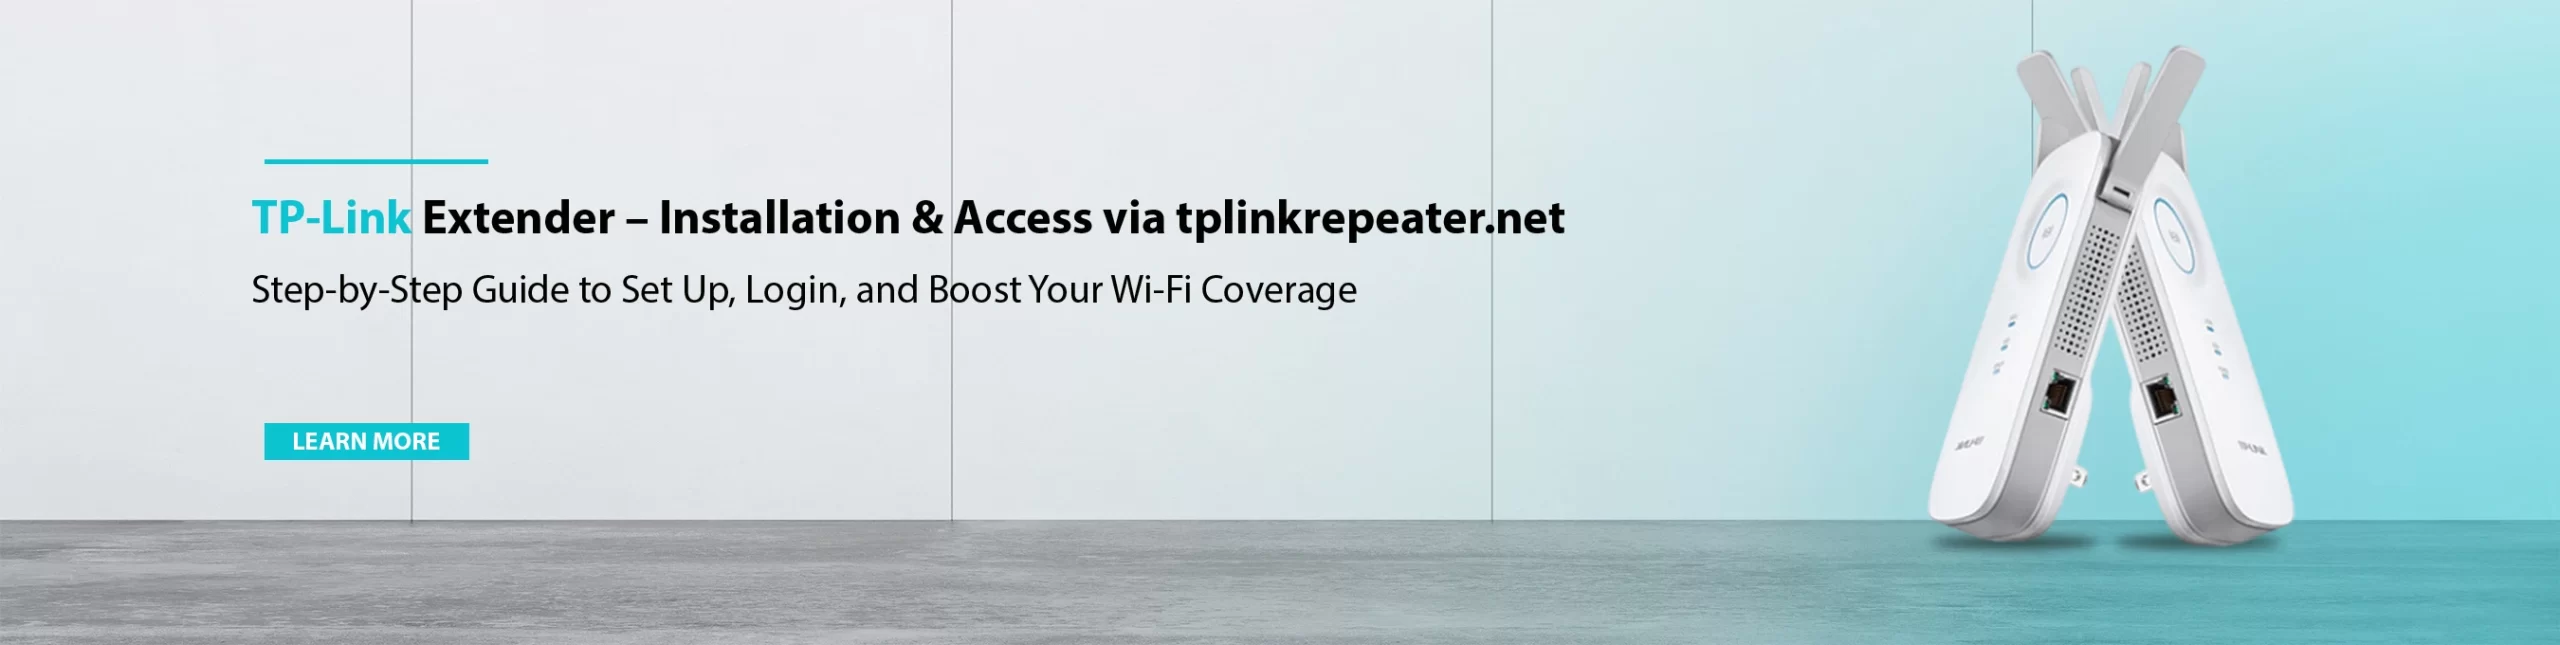
Guide for Successful TP-Link Extender Setup
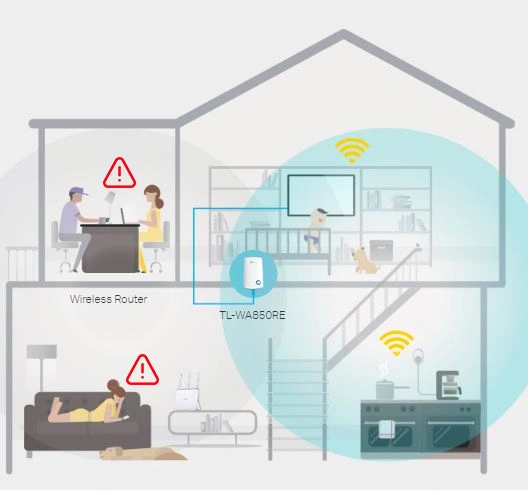
Having reliable WiFi coverage is a must, but dead zones and areas with weak signals are still very common problems. A TP Link WiFi extender is one of the best and most cost-effective ways to expand your coverage area with wireless and to maintain the connection over the entire area. Regardless of the model and your technical expertise, we will help you to correctly finish the TP Link extender setup.
Here you can find detailed step-by-step instructions for browser-based installation, configuring tplinkrepeater.net, setting up without WPS, and using advanced optimization techniques to enhance your wifi performance.
By following this guide, you will not only be able to make your WiFi signal stronger and jam-free but also enjoy stable and consistent WiFi coverage everywhere in your house or office. This is your complete resource for mastering TP Link extender setup from start to finish.
What is TP Link Extender
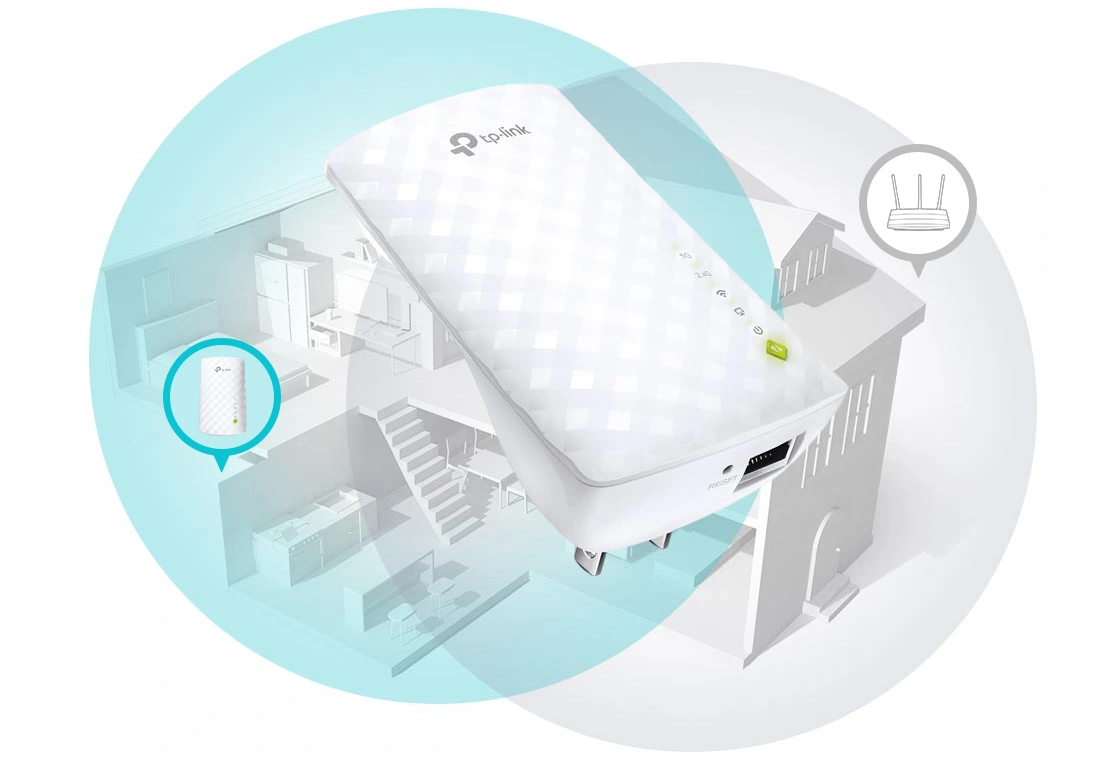
A TP-Link Extender is a wireless signal amplification device designed to eliminate dead zones and expand your router’s coverage area. It works by receiving your existing Wi-Fi signal and rebroadcasting it to hard-to-reach spaces. A WiFi extender ensures consistent connectivity throughout your home or office. This device becomes essential when planning your tp link extender setup, as it supports both WPS and web-based configuration via tplinkrepeater.net or http://tplinkrepeater.net. Moreover, it enables seamless performance during tp-link wifi extender setup and tp link wireless range extender setup, making it easier for users to maintain strong, stable wireless coverage across all connected devices while also helping those looking for how to setup wifi range extender tp link or how to setup a tp link wireless range extender.
Why Use TP Link Extender
You should use a TP-Link Extender when your primary router cannot deliver reliable Wi-Fi coverage to every corner of your premises. After completing the tp link extender setup, the extender strengthens weak signals, minimizes interference, and enhances stability for streaming, gaming, and smart home devices. Users searching online for how do i setup tp link repeater or tp link range extender setup will benefit from this simple upgrade.
Additionally, configurations such as tplinkrepeater.net setup, tp link repeater setup, or even tp link extender setup without WPS allow flexibility for all network environments. Users often seek guidance on how do i setup tp link repeater or how to setup tp link extender because this device dramatically improves range, ensuring smooth connectivity where traditional routers fall short.
Prerequisites for the TP-Link Extender Setup
Before proceeding with the how to setup a TP Link WiFi extender setup, there are a few prerequisites that you should fulfill to complete the configuration. Ensure that you have the following, and note that these components are required regardless of whether you’re performing tp link extender wifi setup or tp link extender setup without wps or even how to setup tp link range extender setup –
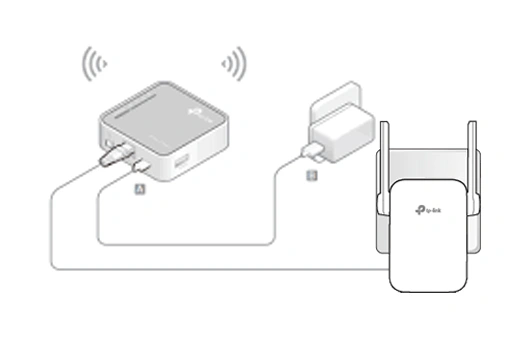
- TP Link WiFi Extender
- A wireless router
- A power outlet near your router
- An active internet connection
- Web GUI/IP address
- WiFi extender credentials (printed on device)
- Tether App
- Computer/Laptop/Smartphone
- Ethernet Cables

Quick checklist - What’s Best Placement for your Extender
Choosing the right spot is crucial for a smooth TP-Link extender setup. Use this quick placement checklist to ensure maximum coverage, stable speeds, and uninterrupted signal flow, especially if you are working through tp-link extender setup or exploring how to setup wifi range extender tp link –
1. Place the extender halfway between your router and the weak-signal area
2. Ensure the router’s Wi-Fi signal is at least 50% strong at that spot
3. Avoid corners, enclosed cabinets, and behind large objects
4. Keep the extender away from interference sources
5. Prefer an elevated position (chest-height or above)
6. Make sure the extender’s signal LED is green or stable
7. Avoid placing it too close to the router
8. Use the TP-Link Tether App (optional) to check signal strength
How to Setup A TP Link WiFi Extender Using Various Methods?
Now that you are aware of the primary things needed to configure the Wi-Fi extender, along with the checklist for finding the best placement for your extender. Let us proceed with the TP Link extender WiFi setup using the various methods given below.
Generally, there are three methods to complete the setup process. The first one is WPS, the second is Web GUI, and the last one is using the App method. We have explained all three methods for tp-link extender setup. So, have a look at the steps for each procedure:
TP-Link Extender Setup Through the Web GUI
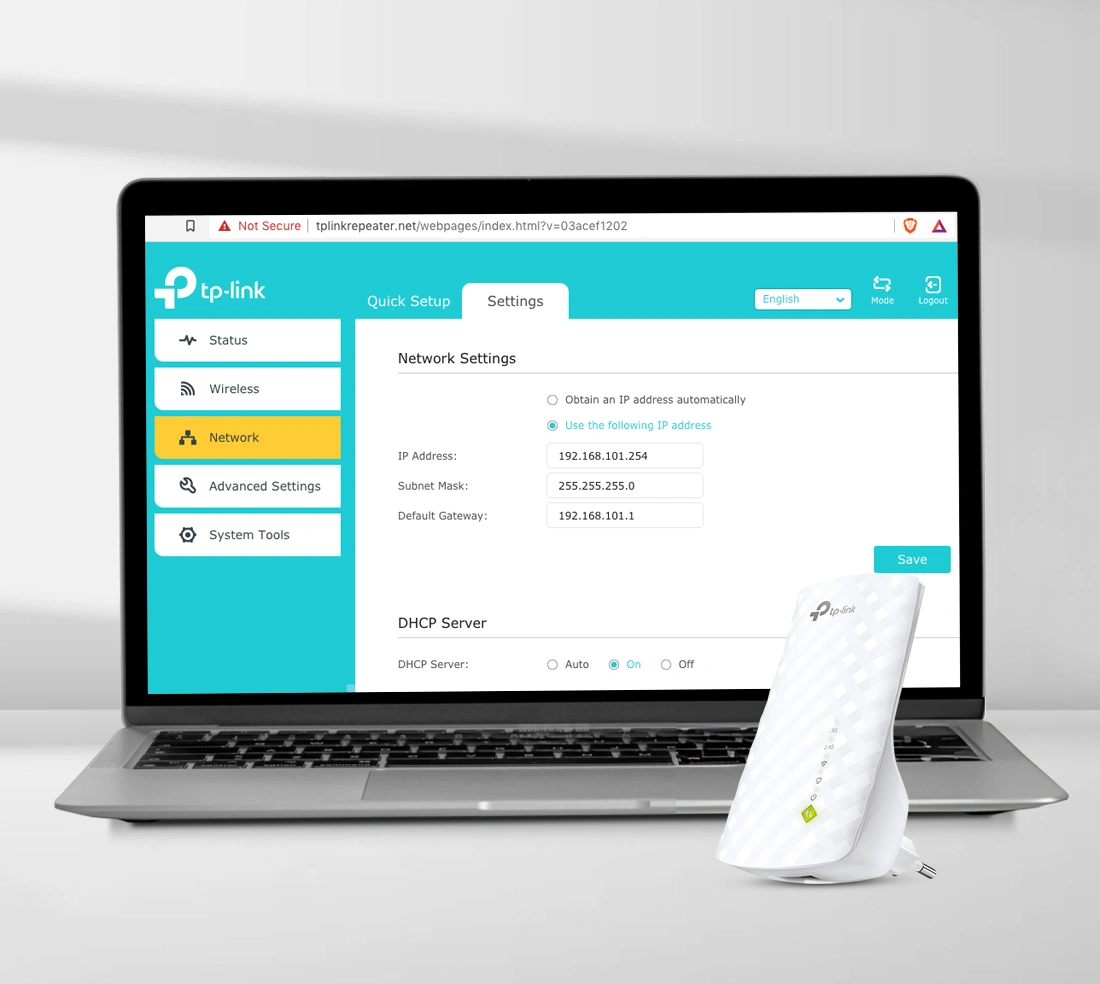
- Initially, connect the device to the range extender network.
- Now, open the web browser and type the tplinkrepeater.net web address, or you can use the 192.168.0.254 IP address in the browser bar.
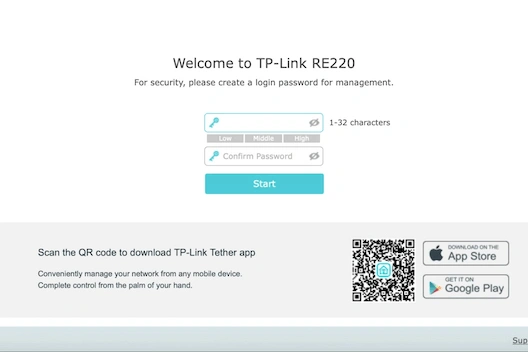
- After that, enter the admin details on the login window to access the web interface.
- Here, you reach the Quick Setup wizard. Then, select the Region here.
- Click on Next, and the extender searches for the nearby available networks.
- Then, select your Home network and enter the password for it.
- Now, tap on Next, and then Finish.
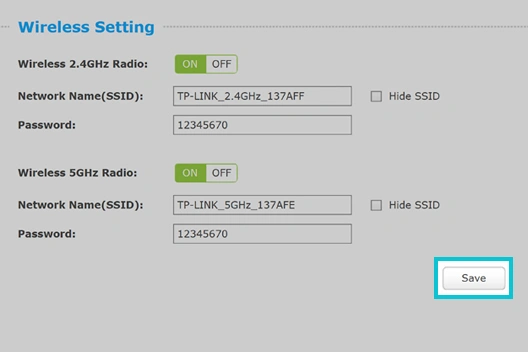
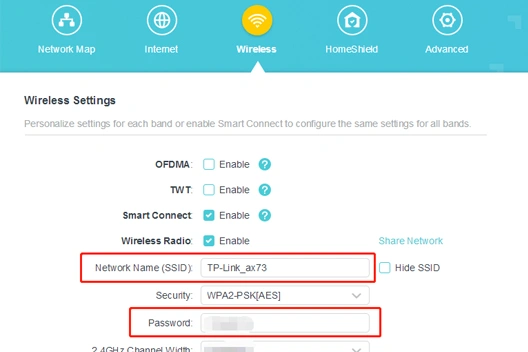
- Now, go back to the extender’s dashboard and click on Basic Settings to modify the SSID name and password if not changed yet.
- Further, visit the Advanced settings, like Parental Controls, Guest Network, etc., to set them accordingly.
- Hereon, follow the guidelines mentioned on your computer screen.
- Finally, tap on Save to implement the recent settings.
These steps also apply when performing how to setup a tp link range extender or tp link extender wifi setup procedures.
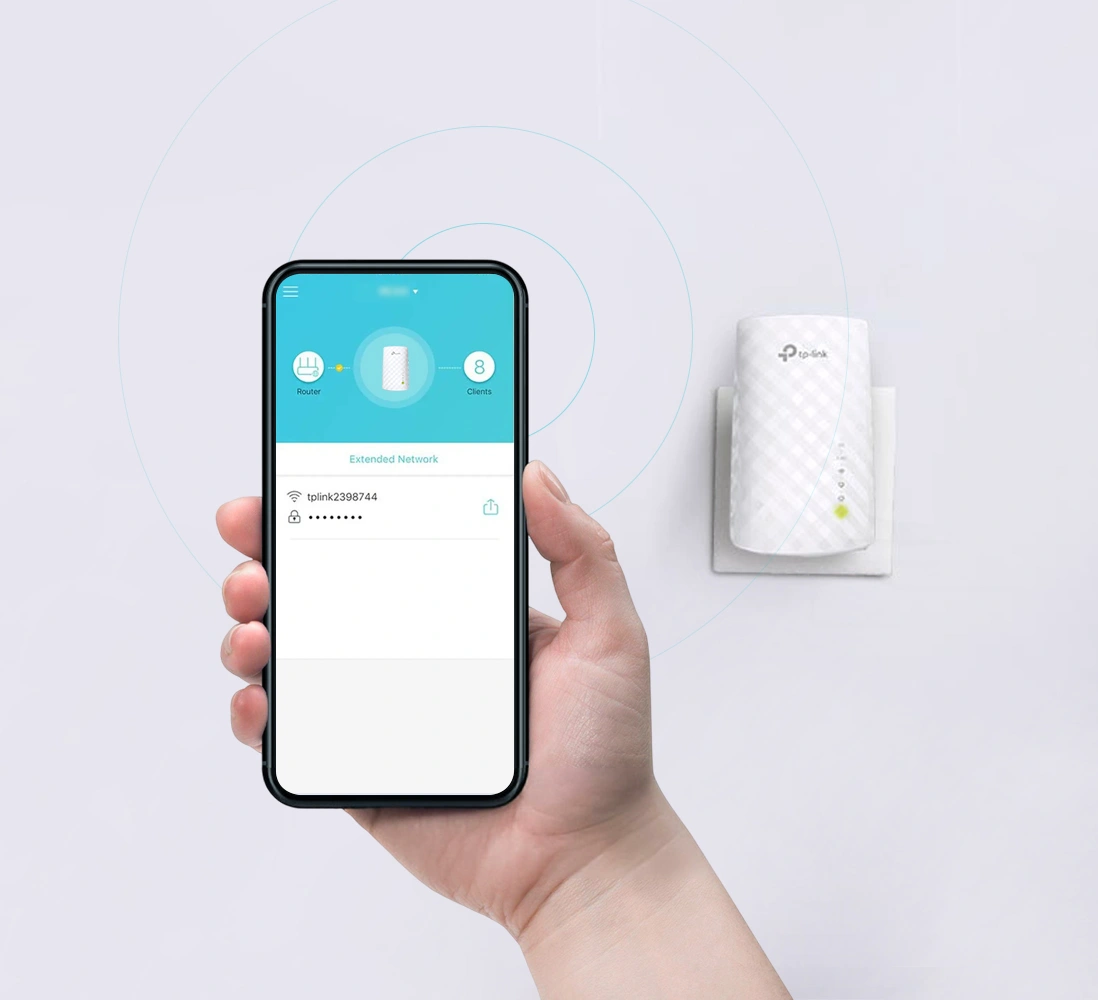
Tether App Method for TP Link Extender Setup
First and foremost, ensure you have an updated version of the Tether app on your smartphone.
Check that your mobile device is linked to the TP-Link extender network.
- Now, open the app and access the admin account by entering the valid user details.
- However, if you do not have the app, then download it by scanning the QR code and creating an account first.
- After logging in, you reach the Quick Set up wizard of the extender.
- Hereon, go to the app dashboard and configure the Basic and Advanced settings by following the on-screen instructions.
- Finally, after completing the settings, click on Save to apply them and relocate the extender to a suitable place.
Finally, you are now aware of how to setup TP-Link extender efficiently, and these steps are similar to how to setup a tp link wireless range extender and users who search for how do i setup tp link repeater can follow them too.
Configuring the Range Extender Using the WPS Button
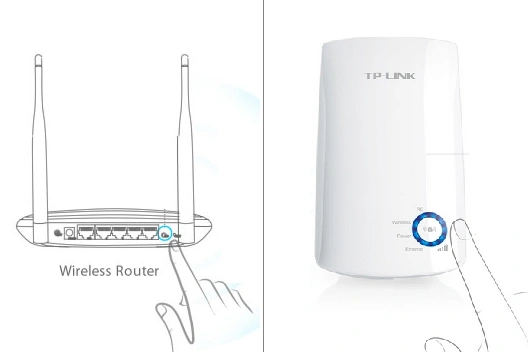
- Firstly, ensure your router and range extender are placed closer to each other.
- Check that the repeater is powered on.
- Initially, locate the WPS knob on the router first and then on the extender.
- After that, press and hold this button on your router first and then on the TP-link extender simultaneously within 2 minutes.
- Wait till the LED blinks on, as this process takes 2-3 minutes.
- Now, release the WPS button, and your extender is linked to the router’s network seamlessly.
- Lastly, access the web interface using the tplinkrepeater.net web GUI to configure further settings or reach out to us.
This method is especially useful for those who prefer tp link extender setup without wps as an alternative or want to compare it with how to setup tp link extender instructions.
Parameter
Login URL
Alternate Login IP
Default Username
Default Password
Set up Network Name (SSID)
Firmware Update Path
Factory Reset Method
Default Value
http://tplinkrepeater.net
192.168.0.254
varies by model
admin or set during first login
TP-Link_Extender, TP-Link_Repeater_XXXX, etc.
Advanced Settings – System Tools – Firmware Upgrade
Press the reset button for seconds until Lthe EDs blink
Post-Setup Checks & Performance Tips
Once your TP-Link extender setup is complete, use this quick checklist to confirm everything is working correctly and optimize your extended network for the best performance. These checks apply whether you’re completing tp link extender wifi setup or revisiting tp link range extender setup steps.
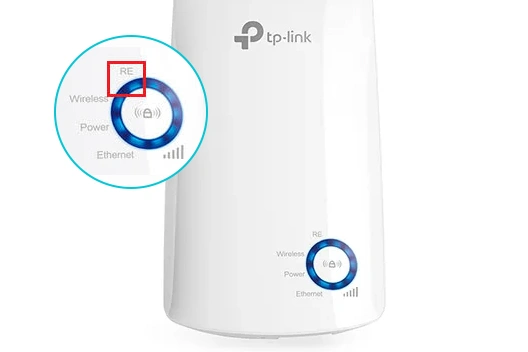
1. Verify LED status on the extender
Ensure the Signal, Power, and Wi-Fi LEDs are stable. A green or solid LED means your extender is receiving a strong signal from the router. If any light is red or blinking, then consider repositioning the device or re-running the setup.
2. Confirm connection via tplinkrepeater.net
Open a browser and visit tplinkrepeater.net to ensure the dashboard loads properly. This confirms your extender is configured and communicating with the router.

3. Test your Wi-Fi speeds in different rooms
All the locations in your home or office should have a stable wifi speed. To test the speed of your wifi extender, run a quick speed test on the extended network in the areas where Wi-Fi was previously weak. Consider moving the extender slightly closer to your router if speeds are still low.
4. Ensure you’re connected to the correct network
After the TP Link WiFi extender setup, you may see two networks:
- Your main Wi-Fi network
- Your extended network (e.g., HomeWiFi_EXT)
Connect to the extended network for maximum coverage.
5. Restart both devices (optional but helpful)
Even though both devices are connected properly, sometimes it may happen that you do not get a stable internet connection. In those cases, you can consider rebooting the router and the extender. The rebooting process helps them sync correctly and improves overall stability after initial setup.
6. Change the default extender password
It is advised to change the default password of your extender. Secure your network by updating the default login credentials on http://tplinkrepeater.net. This prevents unauthorized access.
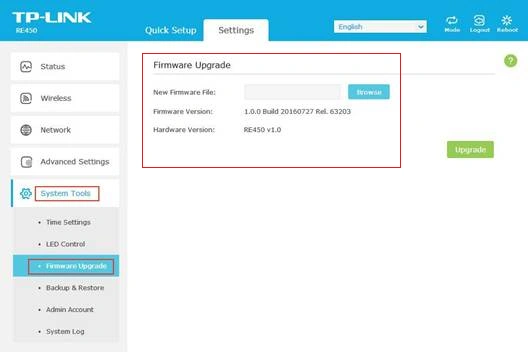
7. Update the extender firmware
Go to Settings, then to Firmware Update in the TP-Link dashboard. Updating the extender firmware ensures that you enjoy good network stability, performance, and security.
8. Reduce interference for smoother speeds
WiFi signals might get deflected if you place metallic objects near them. Therefore, keep the extender away from:
- Metal objects
- Thick walls
- Microwave ovens
- Heavy electrical appliances
This eliminates unnecessary signal loss.
9. Use the same SSID (optional for seamless roaming)
For certain TP-Link models, enabling OneMesh or setting the same Wi-Fi name as your router allows smoother roaming across rooms without disconnections. This is beneficial, especially during how to setup a tp link wireless range extender or tp link extender wifi setup sessions.
Facing Issues With TP-Link Extender Setup? Here are the Fixes!
Moreover, the TP Link repeater setup is quite easy. But occasionally, users experience several issues with their networking device. These can be network disconnectivity, outdated firmware, login denials, etc. So, to assist them, we share some effective troubleshooting methods below to fix them:
- First, check that the range extender is placed closer to the router.
- Next, make sure all the cable connections are working well, and none of the wires are damaged.
- Then, enter the accurate web/IP address and the login credentials.
- Find that the devices get enough power supply.
- Eliminate the network obstructions, such as EMV gadgets, furniture, mirrors, etc.
- Relocate the extender to a ventilated and shaded place.
- Check the router & the extender for the firmware upgrade. If available, then follow the on-screen instructions to complete the firmware update process.
- Fix the web browser issues and remove the unnecessary data. If it does not support the given web address, then shift to another browser.
- However, if the wireless network is unstable, then use the wired internet connection.
- If network issues still persist, then contact your ISP authority.
- Power cycle the networking device to fix the technical glitches and bugs.
- Resync the networking devices if the Wi-Fi LED is not blinking on the extender.
- Disable the security software, such as VPN/Firewall/ Antivirus, etc., for the time being till you complete the TP Link Extender Setup.
- Finally, if none of the given methods work, then factory reset the TP-Link range extender. If you want to know the complete hard reset procedure, approach us on our website.
All things considered, you are now aware of the complete TP Link WiFi Extender Setup process. If you still need help with other TP-Link repeater models, drop us a line!
Frequently Asked Questions
Can I configure the TP-Link Extender Using My Android/iPhone?
For this, you need to have the Tether app on your mobile. After creating the account, add the device to the app and follow the further instructions to complete the setup process.
Tether App is Not Detecting My TP-Link Wifi Extender? How to Fix This?
Make sure your smartphone is compatible with the app, and you are using the latest version of the app. Also, fix the browser issues and ensure a stable network connection. For more info, reach out to us!
Where to Find the WPS Knob at My TP-Link Repeater?
Generally, the WPS button is at the front or the back of the TP-Link range extender as the location of the button varies according to the models.
How to Secure the TP-Link Extender Network After Configuration?
To secure the range extender network, access the web interface of the extender. Here, visit the wireless settings>change the SSID name and password by editing the relevant fields, and then save them.
Can I Use the TP-Link Extender With Any Other Router?
Yes, you can use the TP-Link wifi extender with any other networking gateway.